Thursday, January 23, 2014
Tuesday, January 07, 2014
Develop and deploy ESB artifacts using WSO2 Developer-Studio
Abstract
WSO2 Developer-Studio is the integrated development environment provided by WSO2 to develop your SOA projects. Developer-Studio supports developing projects for most of the products in WSO2 product stack including ESB, AS, DSS and GREG. Not only developing it also supports deployment for both on premise and cloud infrastructure. This article demonstrate the use of Developer Studio to create and deploy a ESB project.
Introduction
As ESB is the heart of any SOA where message mediation, transformation, service integration and core SOA functions take place, one may need to configure ESB for above tasks depending on their requirement. WSO2 Developer Studio provides a featured graphical mediation flow composer to create configurations for WSO2-ESB. In simple terms with WSO2 Developer Studio creating ESB configuration is a matter of few clicks and drag and drops. The improved ESB graphical editor supports almost all building blocks of the WSO2 ESB including Proxy Service, REST APIs, Sequences, Endpoints and many more.
To demonstrate the use of Developer Studio on creating esb-configuration project, we use a sample scenario described in [1], since this covers creating proxy services, sequences and endpoints. The scenario described at [1] is a service chaining use case where ESB plays the service integration role.
Content
1 Summary of the use-case
2 Implementation with Developer-Studio
2.1 Creating ESB Project
2.2 Creating Endpoints
2.3 Creating proxy service
2.4 Creating sequences
2.5 Setting up receiving sequence
3. Deploying
4. References
1. Summary of the use-case
- There are three separate services running at different places (namely GeoEP, HCFacilityLocatorServiceEP, and HCInformationService endpoints)
- The service at GeoEP is capable of mapping a given coordinate (longitude latitude) to a Zip Code (Postal Code).
- The service at HCFacilityLocatorServiceEP can resolve a given zip code to the Healthcare center codes (IDs). One important thing to note here is that, for a given zip code, there may be multiple healthcare center codes returning from the service.
- Finally the service hosted at HCInformationService can resolves the Healthcare Center code to the matching healthcare center details.
- The goal of above scenario is to get a nearest healthcare center details by providing location coordinates (long, lat) information.
- Therefore the ESB here should perform this service integration. First it needs to call the 'Geo Service' to resolve the zip code from the given coordinate, then it should pass zip code to the HCFacilityLocatorService to get Healthcare center codes. Finally healthcare center code is sent to healthcare information service to get the particular center details.
2. Implementation with Developer-Studio
As described in [1], we need to create 3 endpoints for the 3 services listed there. And a proxy service and few sequences. To create these artifacts first of all we need to create an esb-config project to hold them. This article assumes that user has the latest developer-studio downloaded and installed. For installation instructions please follow [2].
2.1 Creating ESB Project
For detailed instruction on creating esb project refer [3], For this scenario I will use following steps.
- Go to Developer-studio Dash Board
- Click on “ESB Config Project” link
- On New ESB Project wizard page leave the “New ESB Config Project” checked as it is the default option
- Click next
- Give “HealthcareEsbConfig” as the Project Name
- Click finish
2.2 Creating Endpoints
Here for this scenario we need to create 3 endpoints named, GeoEP, HCFacilityLocatorServiceEP and HCInformationService. For details instructions on creating endpoints refer [4]. To create GeoEP use the following steps.
- Go to Developer-studio Dash Board and Click on “Endpoint” link

- Leave the “Create A New Endpoint” checked

- Set Endpoint Name as GeoEp,
- Chose Endpoint Type as Address Endpoint,
- Type Address as http://localhost:9764/services/GeoService/
- Choose above created HealthcareEsbConfig for the “Save endpoint in” using Browse button.

Once the endpoint is created, the workspace would be looks like follows.

You may notice following on the workspace.


4. References
[1] - http://wso2.com/library/articles/2012/11/enterprise-service-integration-wso2-esb/
[2] - http://docs.wso2.org/display/DVS350/Installationro
[3] - http://docs.wso2.org/display/DVS350/Creating+ESB+Artifacts#CreatingESBArtifacts-CreatinganESBConfigPject
[4] - http://docs.wso2.org/display/DVS350/Creating+ESB+Artifacts#CreatingESBArtifacts-Creatinganendpoint
[5] - http://docs.wso2.org/display/DVS350/Creating+ESB+Artifacts#CreatingESBArtifacts-Creatingaproxyservice
[6] - http://docs.wso2.org/display/ESB480/Enrich+Mediator
[7] - http://docs.wso2.org/display/DVS350/Creating+ESB+Artifacts#CreatingESBArtifacts-Workingwithsequences
[8] - http://docs.wso2.org/display/ESB480/PayloadFactory+Mediator
[9] - http://docs.wso2.org/display/ESB480/Mediators
[10] - http://docs.wso2.org/display/DVS350/Deploying+and+Debugging
- In Project Explorer (in left hand side) the created ESB project and endpoint is created under synapse-config/endpoints directory as GeoEP.xml
- GeoEp is listed in Tool pallet under Defined Endpoints tool group
- GeoEp.xml is opened in Graphical editor, which uses the 'WSO ESB Graphical” perspective/
- Properties of endpoint is listed in property viewer.
Create the HCFacilityLocatorServiceEP and HCInformationService endpoints by following the same steps. Only difference would be Address field.
2.3 Creating Proxy Service
General information for creating proxy service is listed in docs at [5]. For this scenario we have to use the “Custom Proxy”. Use following steps to create the proxy service named HCCProxyService.

2.3.1 Configuring the proxy service


2.4 Creating Sequences
Configuring the hcfRequest sequence


2.3 Creating Proxy Service
General information for creating proxy service is listed in docs at [5]. For this scenario we have to use the “Custom Proxy”. Use following steps to create the proxy service named HCCProxyService.
- Go to Developer-studio Dash Board and Click on “Proxy Service” link
- In new proxy wizard page keep “Create New proxy Service” checked
- Click next
- Set Proxy Service Name to HCCProxyService, Set Proxy Service type as Custom Proxy from the combo-box and chose HealthcareEsbConfig project to save the proxy service.
- Click on finish
2.3.1 Configuring the proxy service
For the first service we need to call the 'Geo Service' to resolve the zip code from the given coordinate. Therefore we have to create a new request to be sent to Geo Service and enrich that request with the original values of longitude and latitude given from the client.
Since we need to use the original values of longitude and latitude from the client's request, we could use property mediators to keep this values. Later we can verify that the values are properly extracted by putting some log mediators. To add a property mediator to the in-sequence of proxy service do the following.
Click property mediator in the toolbar and then place mouse on somewhere near the arrow head of the in-sequence. If you feels difficult to find the property mediator, just search it and get. (click somewhere on tool palette and type 'p' 'r' then it will appear at the beginning of mediators list)
The objective of first property mediator is to extract the longitude value. To make it clear we will add a description to property mediator as “extract longitude”. As soon as a mediator is dropped the mouse cursor is focus for you to edit this description or you can do this later by double click on the mediator. Adding description will help you to easily understand the function of the mediator. Its like a comment we put on source codes. Then set the parameters of property mediator as Name equals to “longitude” and Expression equals to '"//heal:getHealthcareCenterInfo/heal:longitude/text()". This can be done via the properties panel.
In properties panel type longitude for the 'Property Name' field and then leave the Property action feild to 'set' since we need to set this property. For the 'Value Type', set it as expressions since we use a xpath expression to extract the values from client request. Then click on the 'Value Expression' field, you will see a button with three dots (…) there, click that button to open the expression editor where you can edit the expressions and relevant namespaces (hear namespace is 'heal').
Similarly add another property mediator to set the latitude value. Click on property mediator and drop it after the first property mediator. The graphical editor will connect this automatically for you. Then set the parameters as described in[1].
Then we will add a log mediator to log the values of the properties we set using above property mediators. Logging help for debug purposes for this scenario we could use this to verify that the values are properly extracted. To add a log mediator just search on log on tool palate, click on log mediator tool and again click on graphical editor (after the second property mediator). After adding log mediator set its parameters via property panel. Keep the log category as INFO and log level as SIMPLE and click on the properties field, you will see the (…) button. Click that button to open the property editor and add properties to log.
Than add a enrich mediator to construct the message as expected by GeoEP. Then you can again use another two enrich mediators to set the longitude and latitude properties we extracted above. Since adding and setting parameters are same as we discussed earlier I will omit that details here. For your reference read the docs at [6] for enrich mediator.
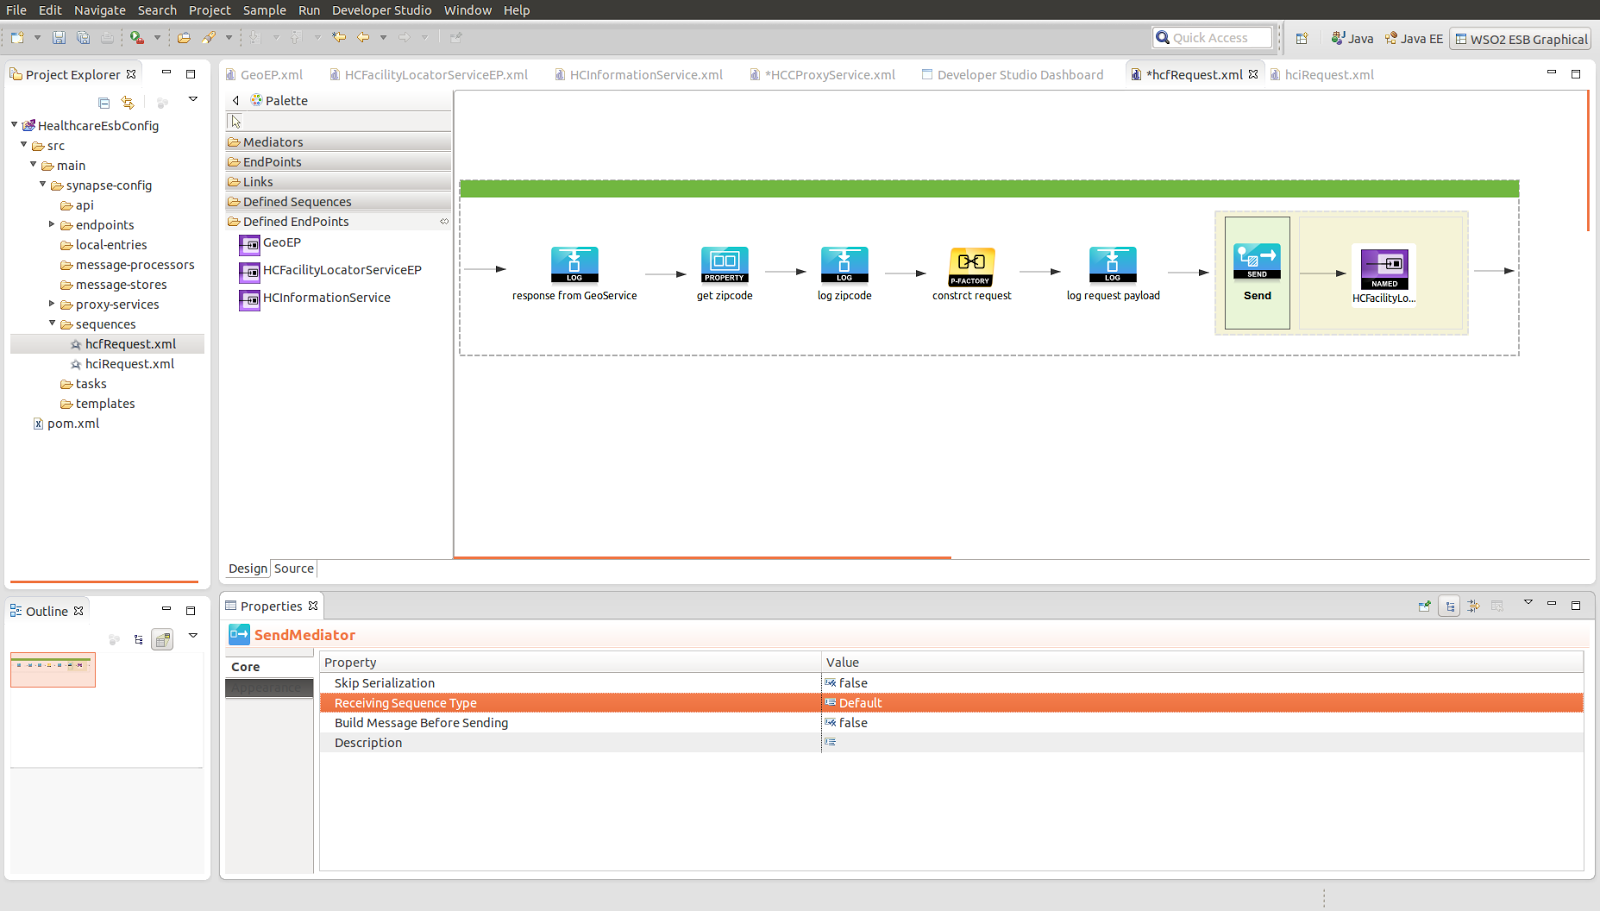
Once you done with above configurations your proxy service would look like follows.
Again we add another log mediator for debugging purpose to verify the constructed message. Now we are ready to send the constructed message to GeoEP. To do this we need a send mediator. Add a send mediator to end of the message flow like we add other mediators in earlier steps.
Now set the endpoint for the send mediation. Here we need to set GeoEP since this request is aimed at Geo Service which is running at GeoEP. To do so expand the defined endpoints tool group and click on GeoEP and then drop it inside the send mediator. You may notice that all the endpoints we created earlier is listed in 'Defined Endpoints' group.
Our next step is to receive the response from Geo Service, extract the zipcode from that and then construct the required payload for the HCFacilityLocatorService. To accomplish this we use the receiving sequence property of send mediator.
Refer 'Setting up a receiving sequence' at the end of this document. It describes how to set hciRequset as the receiving sequence of the send mediator in hfcRequest. You could follow the same steps to set the hcfRequest(after creating) as the receiving sequence for this(proxy service) send mediator.
Now we need to create a sequence (named hcfRequest as described in [1]) to set as the receiving sequence of this send mediator. Following text describes the creating required sequences.
2.4 Creating Sequences
For this use-case we need to create two sequences namely hcfRequest and hciRequest. To create a sequence in Developer-studio refer [7] . To create hcfRequest sequence you can follow the steps below.
- Go to Developer-studio Dash Board and Click on “Sequence” link
- In new proxy wizard page keep “Create New Sequence” checked
- Click next
- Sequence Name to hcfRequest, and chose HealthcareEsbConfig project to save the sequence.
- Click on finish
Configuring the hcfRequest sequence
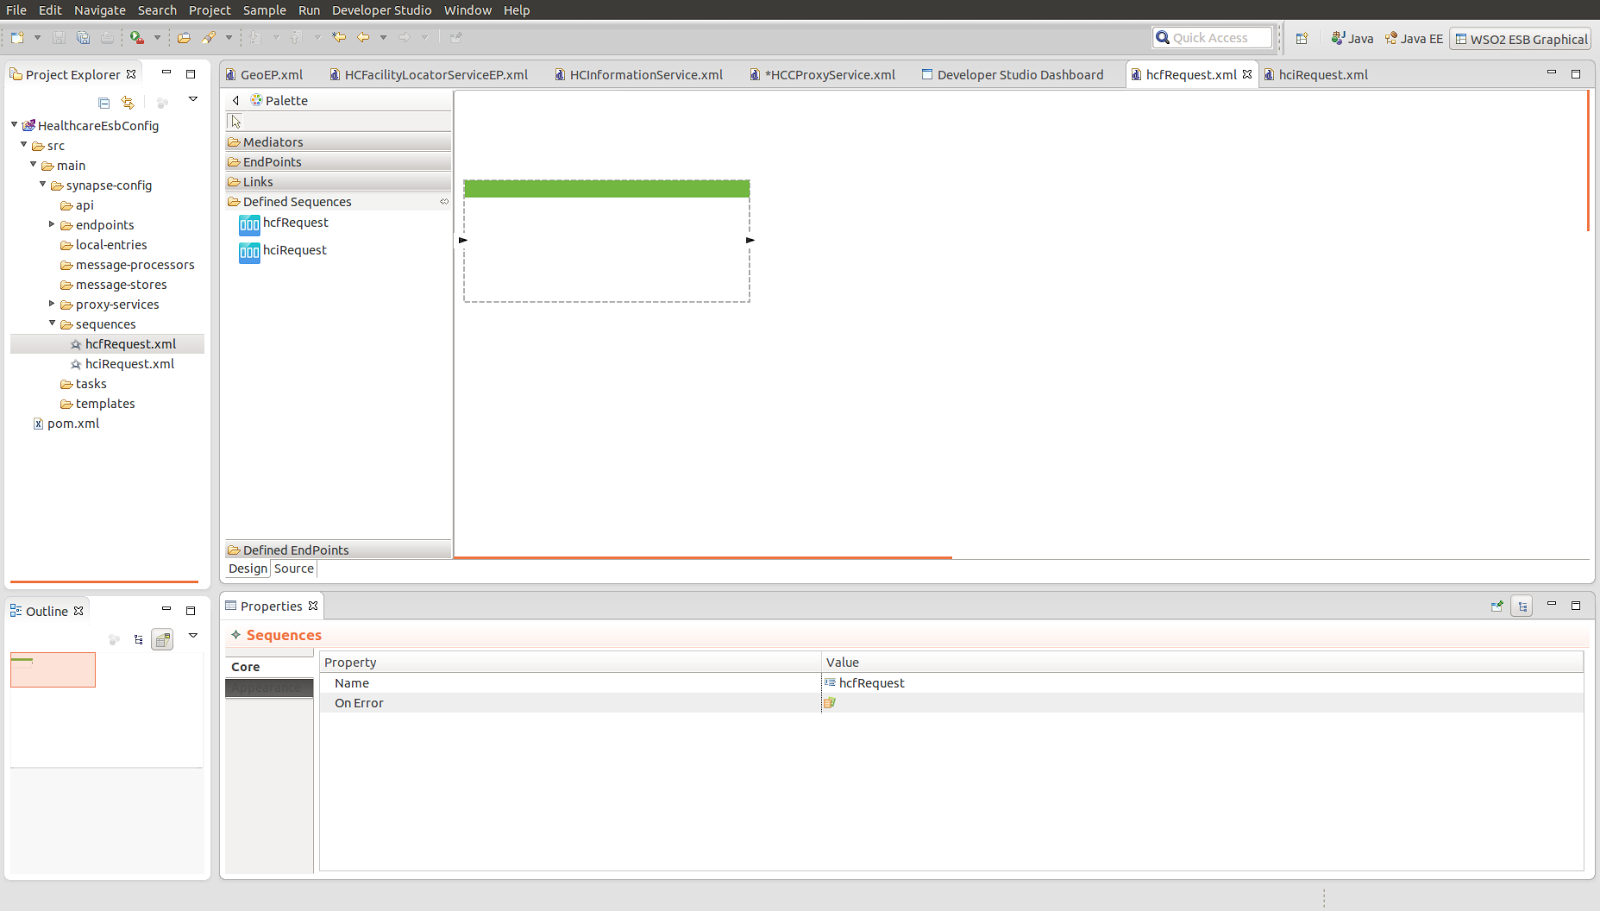
To open the hcfRequest you can either open it by navigating in the project explorer to HealthcareEsbConfig/src/main/synapse-config/sequences/hcfRequest.xml and double click the hcfRequest.xml or simply you can find it via Defined Sequences tool group. Once you open the sequence its initial view would looks as follows.
Now we are ready to configure the hcfRequest sequence. The objective of this sequence is to extract the zipcode from response (we get from the GeoService) and then construct the required payload compatible for the HCFacilityLocatorService. This can be achieved via a property mediator (to extract the zipcode) and a payload factory meadiator [8]. Adding mediators to sequence is same as what we did for proxy service. Add property mediator and payload factory mediator and configure them as per the requirement according to [1].
For debug/verifying purposes we will add log mediators at the beginning, at the middle and at the end the payload factory mediator. Interesting fact to mention here is you don't need to add mediators one after the other. The graphical editor allows adding mediators in the middle as well. It will show with a green tick mark where you can drop a mediator. Once you add the mediators the sequence would look like follows.
The objective of first log mediator is to log the full response we got from Geo Service, The second log mediator is configured to log the zipcode property which is extracted via property mediator. The last log mediator is to log the payload that we construct via payload-factory mediator. Note the descriptions under each mediators, these are not mandatory but once you add them its easy to understand.
Please note that here I did not discuss on how you should configure each mediator. Configuring the parameters of mediators is same as what we did earlier for the mediators in proxy service. What you have to do is click on particular mediator and configure it via properties panel at the bottom. (Once you click on a mediator its parameters will show in properties panel). Please refer docs at [9] on how you could configure mediators and our use-case[1] for the specific requirement.
Now we need to add a send mediator to send this (constructed) request request to HCFacilityLocatorService. Add a send mediator to the end of the sequence and add the HCFacilityLocatorServiceEP endpoint (from the defined endpoints tools group) inside the send mediator. The steps are same as how we ad endpoint in proxy service.
Now we are done with most of the configurations of hcfRequest sequence. According to the use case[1] we are referring, once request is send to HCFacilityLocatorService it will return one or multiple healthcare center codes as its response. Then we need to send this healthcare center codes to HCInformationService to get the matching healthcare center details. That means we have to add another mediation logic to handle this. For this purpose we need to add a reviving sequence to this send mediator and configure the mediation logic inside that sequence.
2.5 Setting the receiving sequence
Setting a receiving sequence to the send mediator can be done via properties panel. To do so first click on the send mediator and you will see that properties panel shows the send mediator related properties. Then you need to change the 'Receiving Sequence Type' property to Static or Dynamic (by default it is set to 'Default' as in the diagram below). For this use case we will set it to static since we have all the sequences defined under our esb config project (HealthcareEsbConfig).
Once you change the Reciving Sequence Type property to Static you will notice that another field (Static Receiving Sequence) will appear with the default value of “/default/sequence”.
Then click on the three dots (...) button appear at the right hand side of the 'Static Receiving Sequence' field. Once you click it will open the resource key editor. From here you can select the resource (note that sequence is also a resource under esb config project) from either workspace, registry or from local entries. For this we will chose 'workspcase' since all our sequences are within the esb project.
Click on workspace link and tis will open the Workspace Element Providers dialog. This dialog will display all the available resources under the workspace. From there choose hciRequest since we need to set hciRequest as the receiving sequence of the send mediator(of the hfcRequest).
Now we are done with all configurations of the hfcRequest. We have one more sequence to configure , that is the hciRequest. Configuration details are not discussed here since configuration steps are much similar as for the hfcRequest. Please refer [1] for the configuration requirement and [9] for the mediators. Once you drag drop and configure the hciRequest sequence it will look as follows.
Note that we use iterate mediator since we need to handle multiple healthcare center codes returning from the HCFacilityLocator service. You may notice that Iterate mediator is a complex mediator where you can define a message flow within that. The send mediator is also a complex one but the difference is that it can only contain endpoints. Now we are done with all the configurations of all the artifacts and its ready to deploy.
5. Deploy
Refer [10] to see how you can deploy these using composite application project.
4. References
[1] - http://wso2.com/library/articles/2012/11/enterprise-service-integration-wso2-esb/
[2] - http://docs.wso2.org/display/DVS350/Installationro
[3] - http://docs.wso2.org/display/DVS350/Creating+ESB+Artifacts#CreatingESBArtifacts-CreatinganESBConfigPject
[4] - http://docs.wso2.org/display/DVS350/Creating+ESB+Artifacts#CreatingESBArtifacts-Creatinganendpoint
[5] - http://docs.wso2.org/display/DVS350/Creating+ESB+Artifacts#CreatingESBArtifacts-Creatingaproxyservice
[6] - http://docs.wso2.org/display/ESB480/Enrich+Mediator
[7] - http://docs.wso2.org/display/DVS350/Creating+ESB+Artifacts#CreatingESBArtifacts-Workingwithsequences
[8] - http://docs.wso2.org/display/ESB480/PayloadFactory+Mediator
[9] - http://docs.wso2.org/display/ESB480/Mediators
[10] - http://docs.wso2.org/display/DVS350/Deploying+and+Debugging
Subscribe to:
Posts (Atom)